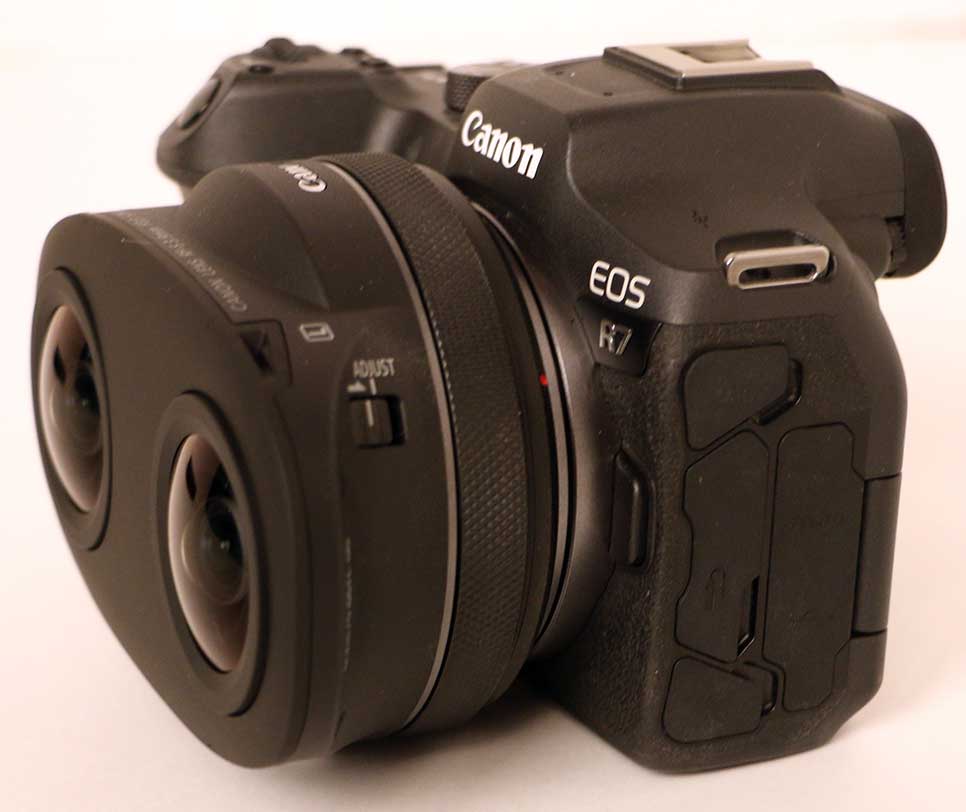
Canon has been creating a number of dual fisheye lens upgrades for their existing line of cameras, and they recently sent me an EOS R7 camera with Dual 3.9mm Fisheye Lens to try out. These dual lens attachments project both sides of the captured stereoscopic image onto the large single sensor, in a side by side configuration. The resulting recordings can then be processed via a variety of methods, and viewed in a VR headset for an immersive experience. But exactly how to do that is worth examining, and the main reason I wanted to check out the camera in the first place.
 This new lens offers a 144 degree field of view, which is less than 180 degrees, but more than enough to cover the view available in a VR headset.
  The lens projects the left and right views onto the sensor side by side, and the resulting recording has the right eye on the left and the left eye on the right. This is due to the natural inversion from the lens, which is always corrected in the camera. Each lens flips its part of the image, and then the camera flips the entire image as a normal part of the recording process. The camera can record stills at up to 6960×4640 or video at UHD resolution (3840×2160). This fisheye recording needs to be converted to equirectangular, and the left and right perspectives swapped before it can be viewed as VR180 in a headset.
I did a whole series of articles on VR360 video editing a few years ago, back when it first started to become popular, so I am familiar with the basic idea. VR180 is a simpler form of that, because you don’t have to worry about the 180 degrees behind the recording perspective, that 99% of viewers aren’t going to look at anyway. The entire immersive workflow landscape has changed dramatically since my earlier 360 video explorations, with lots of camera options, and software tools. Canon has software in their cameras to automatically configure them when a dual lens is attached, and they also have their own software and plugin for Premiere Pro, to allow the footage to be used seamlessly in VR sequences. But there have been a few limitations that have arisen as well. Adobe dropped support for their “Immersive Environment” live VR preview in Premiere Pro and After Effects when version 24 was released last year, and Microsoft announced that they will soon end support for the entire Windows Mixed Reality framework, which my current Lenovo VR headset runs on. But I was able to get everything working in Premiere Pro 23 without too much difficulty, once I got everything installed. ‘Everything’ would include:
Premiere Pro 23.6.8 (Adobe Creative Cloud)
Windows Mixed Reality (Microsoft Store)
SteamVR (Steam)
Windows Mixed Reality for SteamVR (Steam)
R7 HEVC Activator (Canon)
EOS VR Plugin for Premiere Pro (Canon)
Once everything was installed, it worked together without much trouble after the initial default configuration steps for each application. The Canon tools operate in the background, with no user intervention. The WMR software all connects together on its own, once each application is initialized. In Premiere, you have to enable Mercury Transmit, and select ‘Adobe Immersive Environment’ in the ‘Preferences->Playback’ settings. Then you have to enable Adobe Immersive Environment in the Program Monitor panel wrench menu, once you have a VR enabled sequence loaded. But once you do, you can see your VR footage in full stereoscopic glory in your headset, as you are playing back your timeline or making edits. And Premiere can easily export MP4 files that play as VR180 videos in Windows.
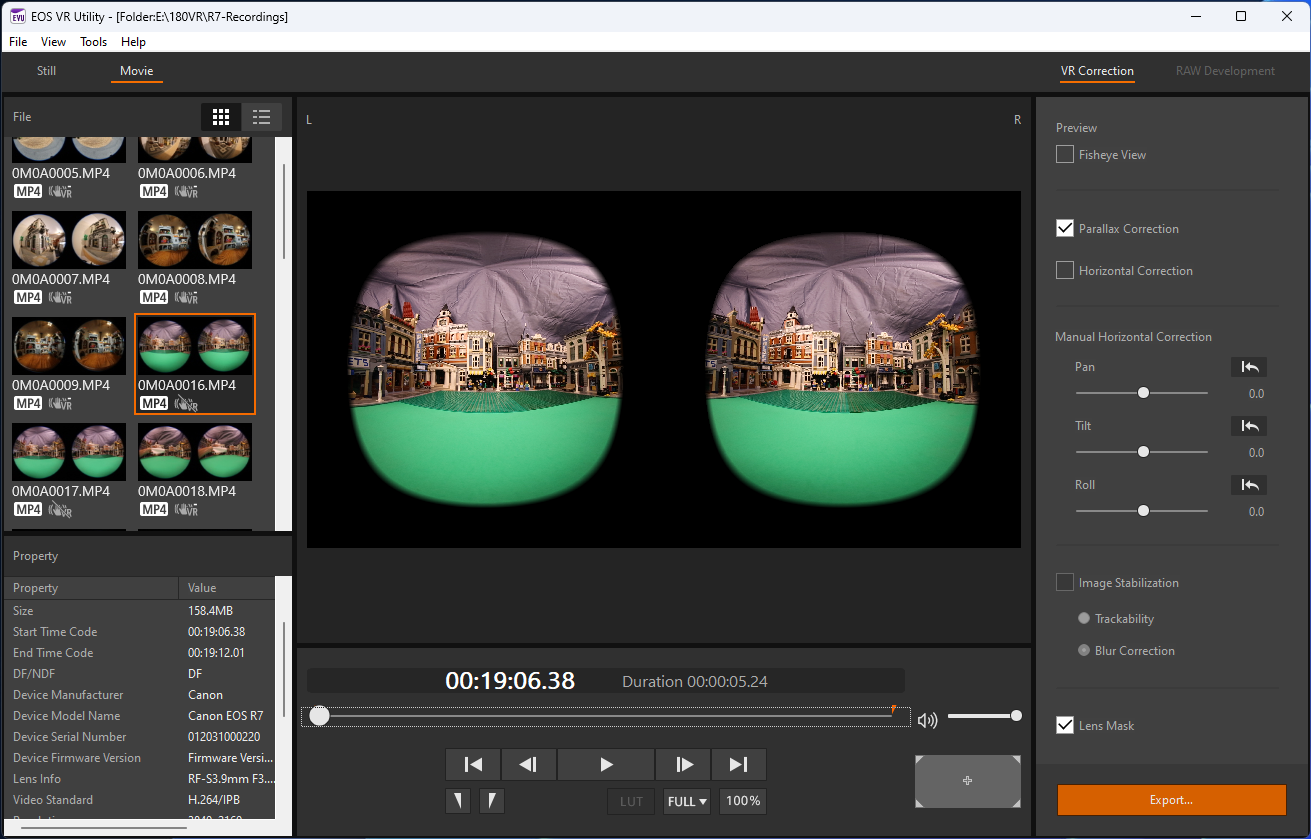
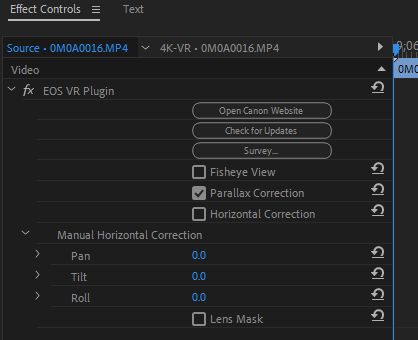 The Canon EOS VR Plugin for Premiere Pro is quite impressive, as it converts the footage from two reversed fisheye views filling a 3840×2160 (standard UHD) H.265 file, into an equirectangular 3840×1920 image, matted to 144 degrees, with the eyes swapped back. My understanding is that it does this on the fly, based on GPU acceleration. There are optional controls for parallax and horizon correction accessible in the source effects panel, and those settings can be copied and pasted like standard presets. That is also how you can disable the conversion from fisheye, presumably for performance reasons. My system handled the 4K conversions without issue, but I understand that the 8K captures from the R5 will be far more processing intensive, so Fisheye view can be use for initial editing, and then the needed assets rendered into equirectangular in a more playback friendly codec like ProRes. But at 4K, I was able to get real-time playback, all the way to my VR headset.
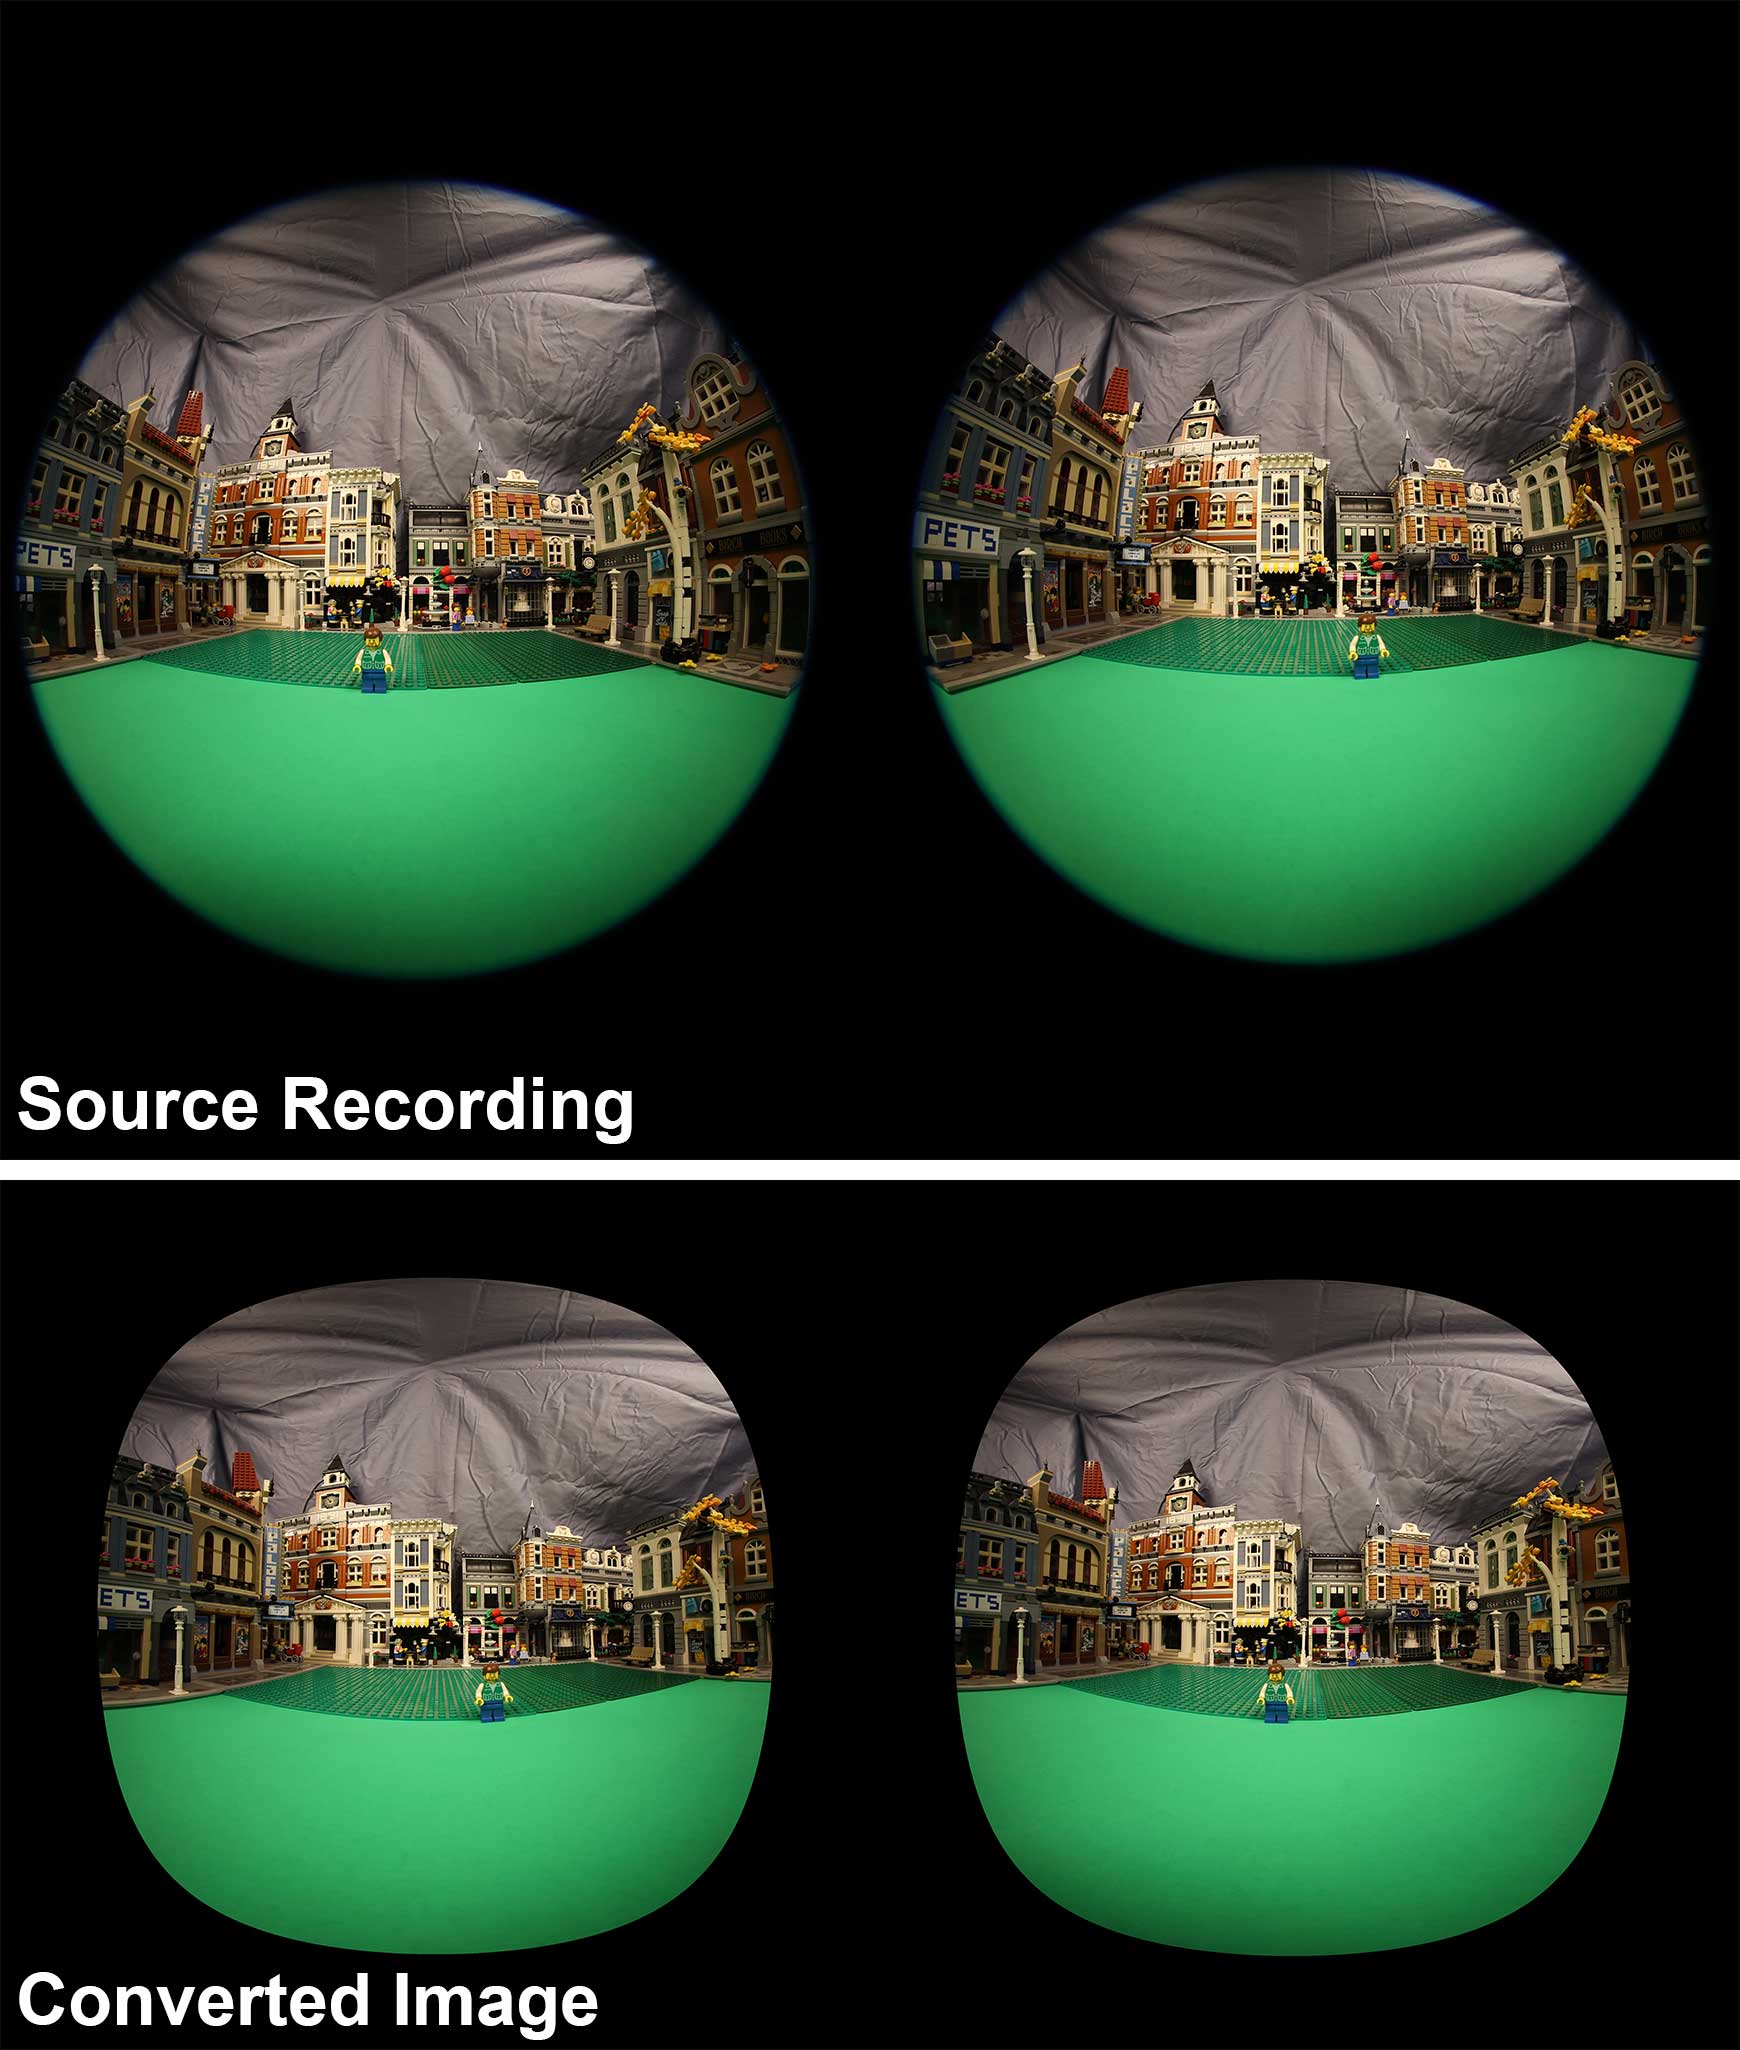
The EOS VR Utility does the same basic processing as the Premiere Pro Plugin, but instead of sending the converted output to your Premiere project, it outputs to DPX, H.264, or HEVC files, for use in other applications, or for direct upload to YouTube or other services. It has all of the same controls, with the addition, at least in the fully licensed version of the application, of adding image stabilization. It also supports converting RAW images, both stills and video, which the Premiere Plugin does not. Now the R7 doesn’t record RAW video, but the more expensive R6 and R5 cameras do, with their full frame 5.2mm lens. So the same program is used for those workflows, even more so than the R7.
 I have Canon’s VR tools running in the free ‘demo’ mode, compared to the fully licensed version that they want $5/month or $50/year for. They appear to license the Plugin separately from the standalone VR Utility, the same price for each. This is a reasonable price if you own the camera and shoot a lot of VR content. But the only feature I was unable to try out without licensing is the image stabilization in the VR utility. Everything else is working for me, including clips longer than 2 minutes, which is the other major listed limitation. So that functionality appears to always be available in the free version. The documentation is unclear on some of those details, and clearly incorrect on others. But so far, it all has worked well for me over the last six weeks, and it seems well designed and thought out.
One other thing I was concerned about handling correctly with this new lens, was the 144 degree field of view, compared to the ‘standard’ 180 degree field of view offered by the 5.2mm lens, and most other immersive cameras. I initially entered 144 degrees as my field of view in the Premiere Pro VR sequence settings, but later realized that the black matting in the recorded images was what limited the recordings to 144 degrees, and so I reset my configuration to 180 degrees in the software, which resulted in proper viewing in the headset.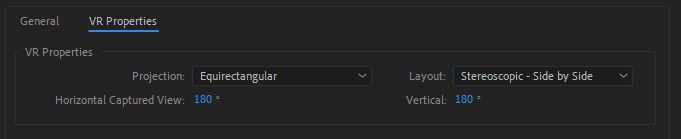
Once I had the entire workflow functioning, which honestly wasn’t as difficult as I was expecting, I was ready to start iterating some content, to learn what does and doesn’t work for VR180 recording. Some of my initial tests were of miniature content, in the form of a Lego scene, since that is what I already have available. The first lesson was that while the lens will focus much closer than the listed 8 inches, you need at least a foot of distance for the 60mm interocular spacing between the two lenses to give you viewable stereoscopic images. The same is basically true of the human face. (You need a minifigure scale interocular distance to get a minifigure’s perspective.) But as long as I didn’t get the camera too close to my foreground objects, the effect in the headset was great. I was even able to composite CGI minifigures from Character Animator into my sequence, using the ‘VR Plane to Sphere’ effect in Premiere, which gave me direct control over their size, position. and stereo depth.
Canon recommends shooting objects “1.6 to 6.5 feet” from the camera for maximum stereoscopic effect. You of course can and will shoot things farther out than that, but the stereo is weaker the farther away you get, because the 60mm difference in perspective doesn’t make much difference at longer ranges. I wanted to test motion as well, so mounting it to the front of my bike, I went for a ride. This is where the 60fps recording gives much smoother results than 24p.
I then exported a stereo VR180 side-by-side video for upload to YouTube. YouTube VR is now pretty much limited to Meta Quest headsets using their dedicated app, although you can pan around VR videos in the browser. Unfortunately YouTube rejected this file, and many others that I tried, until I figured out that it wanted VR360 files, even though it claims to support VR180 input. The difference between VR180 and VR360, is of course that the 360 degree version covers the back half of the sphere. But how do we create VR360 outputs when we only have content for the front 180 degrees? This is similar to how we use 144 degree content in a 180 degree format: by adding black matting. I just had to add enough black matting to the sides to make my VR180 video a VR360 video, in order to get YouTube to accept it. I also converted from side by side to top and bottom stereoscopic for simpler output framing. (1:1 Aspect ratio output instead of 4:1)

In this case the math is fairly simple. In Equirectangular format, 180 degrees is mapped to a square (doubled for stereoscopic), so 360 is a 2:1 image, also doubled for stereoscopic. This can be side by side for an overall 4:1 exported aspect ratio, or over/under, for a 1:1 square output image, with two rectangles. This is similar to the options for VR180, with side by side being a 2:1 aspect ratio, and over under being a 1:2 tall rectangle. Side by side is the preferred format for VR180 because it is similar to the 16×9 aspect ratio that content creators are used to, and the side by side matches the shooting design. (The camera lenses aren’t one above the other, and humans don’t see that way.) But 1:1 is usually an easier aspect ratio to work with than 4:1, based on physical display monitor shapes, so over/under is more popular for VR360 content. Over-under also allows for easier manual conversion between VR180 and VR360.
The way to manually convert between VR180 and VR360 is to double the width of the frame, and leave the source image centered within that new canvas. Doing this for stereoscopic content, the eyes have to be processed separately if they are side by side, but it is automatic if they are over/under.  Regardless, Adobe Premiere has a simple tool for doing this automatically in one step. Once you have your 2:1 stereoscopic VR180 sequence edited and finished, you place that into a new 1:1 Stereo VR360 Over/Under sequence that is twice as tall, and apply the VR Projection effect. The default settings should work automatically if your sequence settings are set correctly, but you can override them to the values displayed here if needed. I have also created a template project anyone is free to use that can be downloaded here. The end result is that your side by side image circles should be rearranged one above the other in the center of the square. You then export this from Premiere Pro to H.264, HEVC, or ProRes, with the VR settings enabled, and upload it to YouTube.
Once it is up on YouTube, the image can be panned around within the browser, or viewed in YouTube VR on a Quest headset or similar device to get the full VR effect. This introduction tutorial I have created was shot on the camera, and can be viewed in a headset, or panned around within the browser window:
As you can see, I had some fun with it, and pushed the limits a bit. The R7 camera is not designed to shoot content that close to the lens, which is what leads to that level of distortion and parallax. But it was an interesting challenge to integrate so much VR and flat content. The VR Plane to Sphere effect in Premiere is a powerful tool in that regard. Honestly the workflows have matured so much that most of what I did was super easy, and Canon’s software did most of the complex work automatically. Besides the headset preview limitations, which require the nearly deprecated Premiere Pro V23, and the VR360 export for YouTube, the workflows are stunningly simple. There are lots of possibilities, and the threshold to get started creating quality VR content is lower than ever.

hi mike,
thanks for the info!
I am shooting the r5mk2 with the vr L lens – but also want to use old stereo card images to put in the Apple Vision Pro.
problem is the flat images are warped by placing them in the headset so that I suppose they need to be “preunwarped” to that they come out straight when warped to the vr space. any ideas about how to do this technically (rather than by trial and error as I have been doing? Let me know what you think about how to accomplish this or if you can point me in the right direction thanks Bryan
The last paragraph describes one approach, as that is what the ‘VR Plane to Sphere’ effect does. Apply that to your images and it will distort them correctly. The trick is going to be to get Premiere to interpret stereoscopic flat images correctly. If your left and right images are separate, you can mask off one to one eye, and one to the other. Another approach to try, if you have a single side-by-side image, is the VR Projection effect. Manually set the input to Stereo Side by Side, and set the Input Horizontal and Vertical FOV to something lower, like 80 and 60. Then adjust the effect values to fine tune the size and location.