I finally got the opportunity to try out the Fusion camera I have had my eye on since GoPro first revealed it in April. The $700 camera uses two offset fish-eye lenses to shoot 360 video and stills, while recording ambisonic audio from four microphones in the waterproof unit. It can shoot a 5K video sphere at 30fps, or a 3K sphere at 60fps for higher motion content at reduced resolution. It records dual 190 degree fish-eye perspectives encoded in H.264 to separate MicroSD cards, with four tracks of audio. The rest of the magic comes in the form of GoPro’s newest application Fusion Studio.
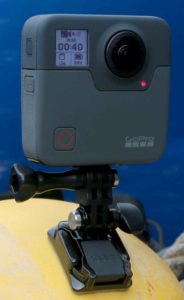 The camera is remarkably simple, and like the Hero6, only has two buttons. There are even fewer options, since 360 cameras are in a sense much simpler. No zoom or focus, no need for a viewfinder, etc. There are four basic modes: 5Kp30, 3Kp60, photo, and time-lapse. You start and stop recording, and that is it. The menu is a bit challenging to use with only two buttons, and no touch screen, but it gets the job done, after a little practice.
Internally the unit is recording dual 45Mb H.264 files to two separate MicroSD cards, with accompanying audio and metadata assets. This would be a logistical challenge to deal with manually, copying the cards into folders, sorting and syncing them, stitching them together, and dealing with the audio. But with GoPro’s new Fusion Studio application, most of this is taken care of for you. Simply plug-in the camera, and it will automatically access the footage, let you preview, and select which parts of which clips you want processed into stitched 360 footage or flattened video files. It also processes the multi-channel audio into ambisonic B-Format tracks, or standard stereo if desired. The app is a bit limited in user control functionality, but what it does do, it appears to do very well. My main complaint is that I can’t find a way to manually set the output filename, but I can rename the exports in Windows once they have been rendered. Trying to process the same source file into multiple outputs is challenging for the same reason.
| Setting | Recorded Resolution (Per Lens) | Processed Resolution (Equirectangular) |
|---|---|---|
| 5Kp30 | 2704×2624 | 4992×2496 |
| 3Kp60 | 1568×1504 | 2880×1440 |
| Stills | 3104×3000 | 5760×2880 |
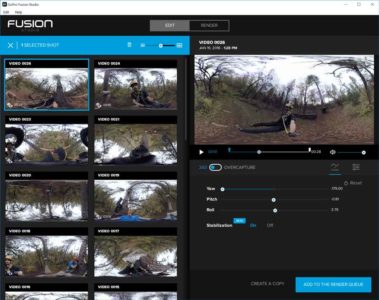
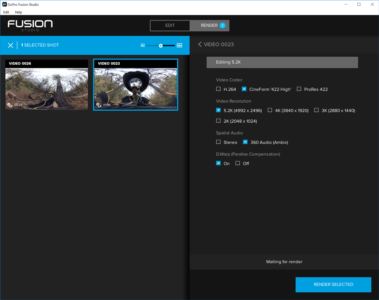 With the Samsung Gear 360 I researched five different ways to stitch the footage, because I wasn’t satisfied with the included app. Most of those will also work with Fusion footage, and you can read about those options here, but they aren’t really necessary when you have Fusion Studio. You can choose between H.264, Cineform or ProRes, your equirectangular output resolution, and ambisonic or stereo audio. That gives you pretty much every option you should need to process your footage. There is also a “Beta” option to stabilize your footage, which once I got used to it, I really liked. It should be thought of more as a “remove rotation” option, as it is not for stabilizing out sharp motions which still leave motion blur, but for maintaining the viewer’s perspective even if the camera rotates in unexpected ways. Processing was about 6x run-time on my Thinkpad P71 laptop, so a 10 minute clip would take an hour to stitch to 360.
The footage itself looks good, both onscreen and in my Lenovo Explorer WMR headset, higher quality than my Gear 360 footage. And the 60p stuff is much smoother, as is to be expected. While good VR experiences require 90fps to be rendered to the display to avoid motion sickness, that does not necessarily mean that 30fps content is a problem. When rendering the viewer’s perspective, the same frame can be sampled three times, shifting the image as they move their head, even from a single source frame. That said, 60p source content does give smoother results than the 30p footage I am used to watching in VR. But 60p did give me more issues during editorial, and I had to disable CUDA acceleration in Premiere Pro to get Transmit to work with the WMR headset.
Once you have your footage processed in Fusion Studio, it can be edited in Premiere Pro, just like any other 360 footage, but the audio can be handled a bit different. Exporting as stereo will follow the usual workflow, but selecting ambisonic will give you a special spatially aware audio file. Premiere can use this in a 4-Track multi-channel sequence, to line up the spatial audio with the direction you are looking in VR, and if exported correctly, YouTube can do the same thing for your viewers.
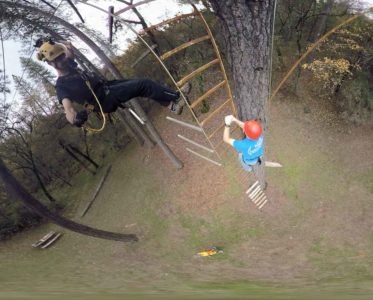 Most GoPro products are intended for use capturing action moments and unusual situations in extreme environments (which is why they are waterproof and fairly resilient) so I wanted to study the camera in it’s “native habitat.” The most extreme thing I do these days is work on ropes courses, high up in trees or telephone poles. So I took the camera out to a ropes course that I help out with, curious to see how the recording at height would translate into the 360 video experience. Ropes courses are usually challenging to photograph because of the scale involved. When you are zoomed out far enough to see the entire element, you can’t see any detail, or if you are so zoomed in close enough to see faces, you have no good concept of how high up they are. 360 photography is helpful, in that it is designed to be panned through when viewed flat, so you can give the viewer a better sense of the scale, and they can still see the details of the individual elements or people climbing. And in VR, you should have a better feel for the height involved.
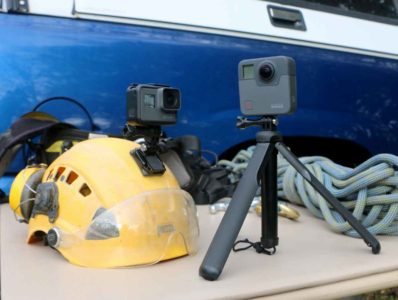 I had the Fusion camera and Fusion Grip extendable tripod handle, as well as my Hero6 kit, which included an adhesive helmet mount. Since I was going to be working at heights, and didn’t want to drop the camera, the first thing I did was rig up a tether system. A short piece of 2mm cord fit through a slot in the bottom of the center post, and a triple fisherman knot made a secure loop. The cord fit out the bottom of the tripod when it was closed, allowing me to connect it to a shock absorbing lanyard, which was clipped to my harness. This also allowed me to dangle the camera from a cord for a free floating perspective. I also stuck the quick release base to my climbing helmet, and I was ready to go.
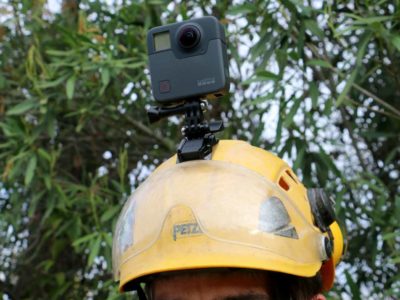
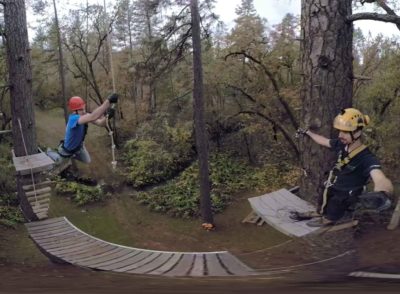 I shot segments in both 30p and 60p, depending on how I had the camera mounted, using higher frame rates for the more dynamic shots. I was worried that the helmet mount would be too close, since GoPro recommends keeping the Fusion at least 20cm away from what it is filming, but the helmet wasn’t too bad. Another inch or two would shrink it significantly from the camera’s perspective, similar to my tripod issue with the Gear 360. I always climbed up with the camera mounted on my helmet, and then switched it to the Fusion Grip to record the guy climbing up behind me, and my rappel. Hanging the camera from a cord, even 30′ below me, worked much better than I expected. It put GoPro’s stabilization feature to the test, but it worked fantastic. With the camera rotating freely, the perspective is static, although you can see the seam lines constantly rotating around you. When I am holding the Fusion Grip, the extended pole is completely invisible to the camera, giving you what GoPro has dubbed “Angel view.” It is as if the viewer is floating freely next to the subject, especially when viewed in VR.
Because I have ways to view 360 video in VR, and because I don’t mind panning around on a flat screen view, I am less excited personally in GoPro’s OverCapture functionality, but I recognize it is a useful feature that will greater extend the use cases for this 360 camera. It is designed for people using the Fusion as a more flexible camera to produce flat content, instead of to produce VR content. I edited together a couple OverCapture shots inter-cut with footage from my regular Hero6 to demonstrate how that would work.
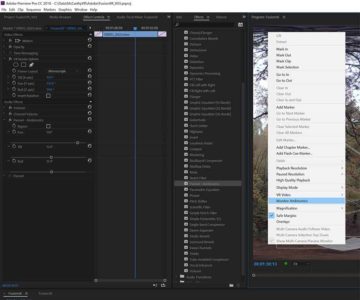 The other new option that Fusion brings to the table is ambisonic audio. Editing ambisonics works in Premiere Pro, using a 4-track multi-channel sequence. The main workflow kink here is that you have to manually override the audio settings every time you import a new clip with ambisonic audio, to set the Audio Channels to Adaptive with a single timeline clip. Turn on Monitor Ambisonics by right clicking in the monitor panel, and match the Pan, Tilt, and Roll in the Panner-Ambisonics effect to the values in your VR Rotate Sphere effect, (note that they are listed in a different order) and your audio should match the video perspective. When exporting an .MP4, in the audio panel set Channels to 4.0 and check the Audio is Ambisonics box. Best I can tell, the Fusion Studio conversion process compensates for changes in perspective, including “stabilization” when processing the raw recorded audio for Ambisonic exports, so you only have to match changes you make in your Premiere sequence.
While I could have intercut the footage at both settings together into a 5Kp60 timeline, I ended up creating two separate 360 videos. This also makes it clear to the viewer which shots were 5Kp30 and which were recorded at 3Kp60. They are both available on Youtube, and I recommend watching them in VR for the full effect. But be warned that they are recorded at heights up to 80 feet up, so it may be uncomfortable for some people to watch.
GoPro’s Fusion camera is not the first 360 camera on the market, but it brings more pixels and higher frame-rates than most of it’s direct competitors, and more importantly has the software package to assist its users in the transition to processing 360 video footage. It also supports ambisonic audio, and OverCapture functionality for generating more traditional flat GoPro content. I found it to be easier to mount and shoot with than my earlier 360 camera experiences, and it is far easier to get the footage ready to edit and view using GoPro’s Fusion Studio program. The Stabilize feature totally changes how I shoot 360 videos, giving much me more flexibility in rotating the camera during movements. And most importantly, I am much happier with the resulting footage that I get when shooting with it.


Hey Mike, great review thanks alot! I have a GoPro Fusion as well but I struggle a lot with the Studio render file. It is blurry on the sides and I cant view it at all on my windows laptop (black screen with audio). When I open it in Adobe Premiere everything works fine but its still blury on the sides (I export 360 files to use with the gopro plugins in adobe but make non vr footage with it at the end). Do u have any idea what this could be?
Thanks and cheers
Xenia
In order to play Cineform files outside of Adobe apps, you need GoPro Studio installed, which apparently has been replaced with “Quik Desktop”, which can be found here:
https://shop.gopro.com/softwareandapp/quik-%7C-desktop/Quik-Desktop.html
In regards to the blur edges, do they become less blurry as you pan those sections of the image to the center of the display. If so, that is just a function of the 360 to flat conversion. If not, you may have something else going on, but that is hard to diagnose without seeing it.